Welcome to this quick JMeter tutorial for basic setup and installation. In this tutorial, we’ll walk you through the required steps to prepare it for load testing.
Simple JMeter Tutorial to Get You Started
Mostly, we use JMeter for Performance testing. However, it can also be used with Selenium for automating load-testing tasks.
JMeter is a core Java application that can run on any platform that supports Java. Also, if you ask for a load testing tool from any seasoned tester, he would recommend JMeter. It supports several operating systems where you can run JMeter to execute the load tests.
Supported Platforms
Check out the below matrix which lists the commonly used platforms/OS where you can set up JMeter for load testing tasks.
| JMeter Version | JVM/JDK Version | Supported Platform/OS |
|---|---|---|
| JMeter 3.0 | Java 7+ | Windows 8.x (x86_64), Windows 7 (x86_64), Mac OS 10.9.x (x86_64), Ubuntu 15.x (x86_64) |
| JMeter 2.12 | Java 6/7 | Windows 8.x (x86_64), Windows 7 (x86_64), Mac OS 10.9.x (x86_64), Ubuntu 14.x (x86_64) |
| JMeter 2.9 | Java 6/7 | Windows XP (i386), Windows 7 (x86_64), Mac OS 10.9.x (x86_64), Ubuntu 14.x (x86_64) |
We’ll run the JMeter setup on a Windows 7 machine for today’s JMeter tutorial. Here are some quick links to navigate you through the JMeter tutorial.
Simple Steps to Set up JMeter
Since JMeter is a desktop-based Java app, it needs a compatible JVM to run. For example, we will install JMeter 3.0 on a Windows 7 system. So it’ll require Java 7+.
Check if Java is Installed
For a note, if you plan to build some project, download the JDK package only. Next, you should check the installed Java version. So open the terminal and run the following command.
C:\Users\jmeter>java -version
java version "1.8.0_92"
Java(TM) SE Runtime Environment (build 1.8.0_92-b14)
Java HotSpot(TM) 64-Bit Server VM (build 25.92-b14, mixed mode)
In most cases, the above command would succeed, but if it fails try re-installing Java again.
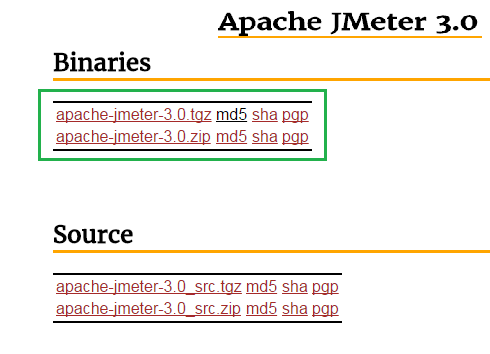
Download JMeter Setup
The most stable version to date is JMeter 3.0. So to download it, click on the below link.
Installing JMeter
It’s reasonably easy to install JMeter. You need to extract the zip file downloaded in the previous step. After unpacking the zip file, you see a tree layout like the following.
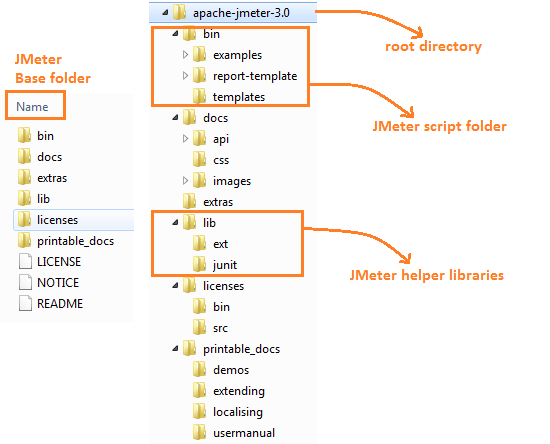
Here is a brief checklist of folders included in the JMeter zip file.
| JMeter Folder | Description |
|---|---|
| <bin> | Holds the script file to launch JMeter. |
| <docs> | Offline reference docs. |
| <extras> | Ant script extensions. |
| <lib> | Holds helper Jar libs for JMeter. |
| <lib/ext> | Contains JMeter protocol libs. |
| <lib/junit> | JUnit lib for JMeter. |
| <printable_docs> | Contains ready to print docs. |
Start JMeter for Load Testing
Following are three ways to launch JMeter.
- Run JMeter in desktop mode.
- Start JMeter in service mode.
- Launch JMeter in console mode.
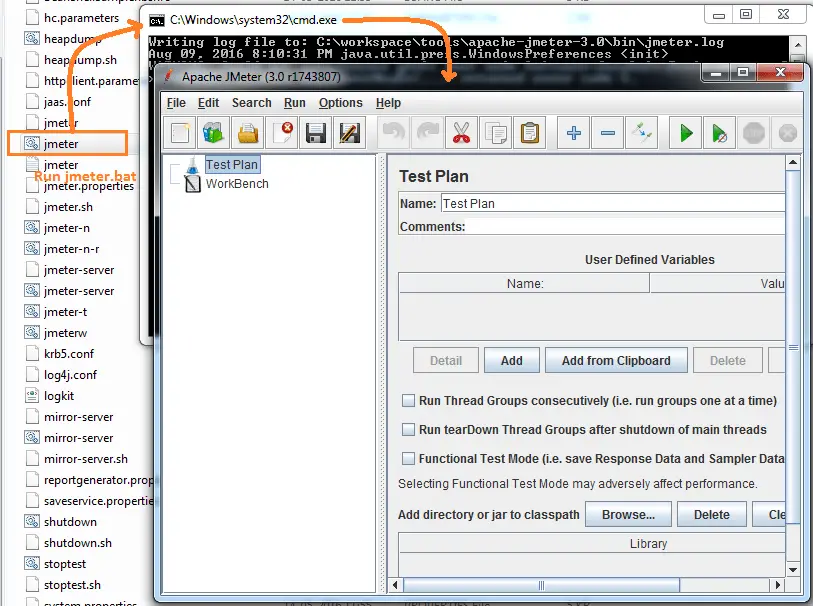
Run JMeter in Desktop (GUI) Mode
Go to the <bin> folder and run the <jmeter.bat> script.
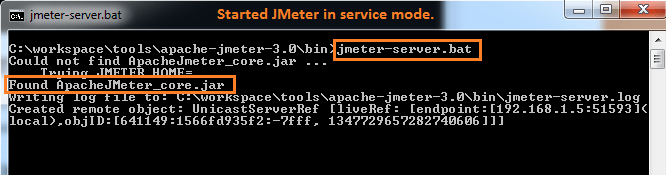
Start JMeter in Service Mode
You run JMeter in service or server mode to execute tests on multiple nodes. One machine works as the master and the others as the slaves. In this manner, you can generate the concurrent load from several JMeter clients.
JMeter provides a <jmeter-server.bat> script under the <bin> folder to start the server.
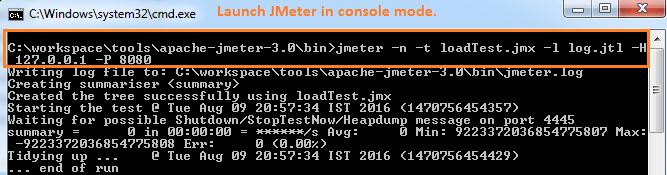
Launch JMeter in Console Mode
When you run JMeter in desktop or UI mode, it consumes a lot of RAM. But there is a way to reduce memory utilization, i.e. by running the JMeter in console mode.
The JMeter tool takes multiple arguments from the command line. Please follow the below syntax to launch JMeter from the console.
jmeter -n -t <loadTest.jmx> -l <log.jtl> -H <127.0.0.1> -P 8080
You can also run the JMeter in the same manner as we did in the above example. But make sure you have the file created from the JMeter in GUI mode.
Otherwise, the above command will return the <could not open loadTest.jmx> error.
Install JMeter on Different OS
In this part of the JMeter tutorial, we’ll give you basic commands to install JMeter on Ubuntu (e.g. 14.04/15), Mac OS X, and CentOS. But please ensure you’ve Java installed on these systems before installing the JMeter.
Install JMeter on Ubuntu
Please note that you will run the JMeter installation with the root user. So add <sudo> before running the <apt-get> command.
$ sudo apt-get install jmeter
Install JMeter on Mac OS X
To install JMeter on Mac, run the below command.
brew install jmeter
To install JMeter along with plugins, use the following command.
brew install jmeter --with-plugins
Install JMeter on CentOS
$ sudo yum install jmeter
Final Word – A Simple JMeter Tutorial
We tried our best to present this JMeter tutorial in a simplified format. Hopefully, it could also be helpful for you in starting with the JMeter for load testing.
We’re always open to feedback, so please don’t hesitate to share your thoughts with us using the contact page. We appreciate your input, and we’ll use it to improve our blog and make it even more informative and helpful for our readers.
Lastly, our site needs your support to remain free. Share this post on social media (Linkedin/Twitter) if you gained some knowledge from this tutorial.
Happy testing
TechBeamers.