Understanding the Page Object Model (POM) and Page Factory in Selenium is important for writing efficient and maintainable automation scripts. POM helps you keep web elements and actions in a structured way, making your code more concise. Page Factory eases up the creation of page elements, resulting in cleaner and less code. Learning these concepts is essential when you are working on a large project. Hence, this tutorial aims to equip you with the skills needed to improve the effectiveness and reliability of your automation tests.
A Quick Guide to Page Object Model and Page Factory
In practical terms, the Page Object Model (POM) is a design pattern used in Selenium automation testing. It involves arranging your code to represent web pages as objects, encapsulating their elements and actions in dedicated classes. This approach improves the code structure, reusability, and maintainability, making it easier to manage and update test scripts as your web application evolves.
The Concept of Page Object Model
The Page Object Model, or POM, treats each webpage as a reusable object in your code. It stores UI elements and actions within these objects, separating them from test logic. This keeps tests clean, promotes DRY principles, and makes them easier to maintain and scale. Imagine organized code where UI changes only affect the page object, not every test!
Benefits of the Page Object Model
POM’s magic lies in separation! Each webpage becomes a dedicated object, housing its elements and actions. This offers 3 main benefits:
POM keeps your tests organized, efficient, and scalable, making you a true automation champion!
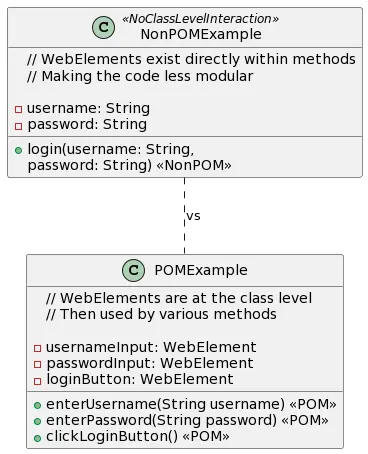
For example – A non-POM class in your project can have a method A that directly interacts with a webpage and fetches some data. Other class methods also need this data but can’t access it as it was local to function A. Moreover, external classes may require a similar function but implement a duplicate method.
On the other hand, the page object model solves this problem. It follows certain specifications and can overcome all the above issues we saw. Below is a diagram briefly capturing the differences between non-POM vs POM classes.
How to Apply POM in Projects
You can get POM into your project in the following 3 steps:
Remember, it’s all about separation and organization! By following these steps, you’ll unlock the power of POM for maintainable and efficient Selenium tests.
Demo Selenium Project for POM
For the demo in this tutorial, we used the latest Selenium version 4, Java 17, and the latest / stable Google Chrome driver.
Great! Let’s create a demo Selenium Java project using the Page Object Model for booking a flight from the Google Flights page. We’ll provide a simple example; please adjust it based on your specific needs and the actual structure of the web page.
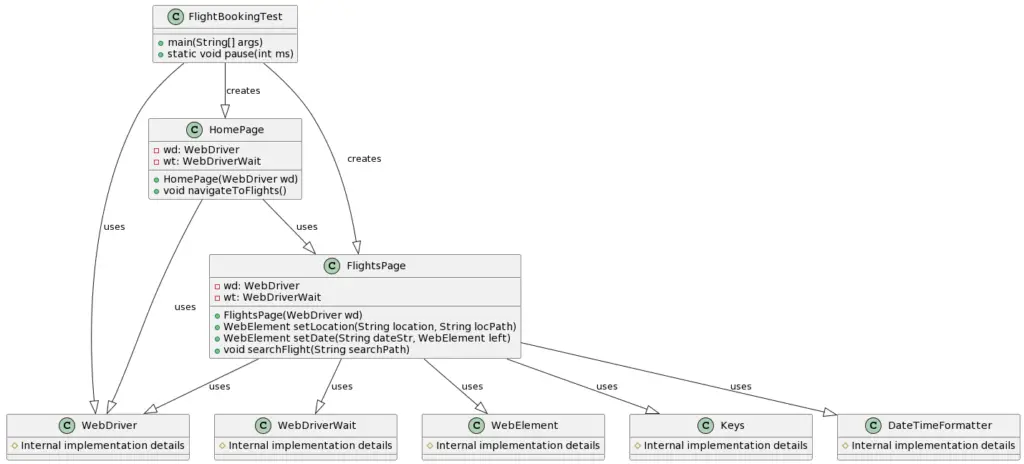
This demo project has 2 page classes and a test class. The following is the UML class diagram representing the architecture briefly. It will help you get clarity on what these classes are doing.
Let’s now get the code into action. Build and run the POM project on your system using the following steps.
Step1. Create Page Classes
Create a class for each page on the website. In this case, you may need a class for the Google Flights homepage and another for the flight booking page.
The following is the first of the page classes you should create. It will launch the browser and open the Google flight search page.
// HomePage.java
import org.openqa.selenium.By;
import org.openqa.selenium.WebDriver;

public class HomePage {
  private WebDriver wd;

  public HomePage(WebDriver wd) {
    this.wd = wd;
  }

  public void navigateToFlights() {
    wd.get("https://www.google.com/travel/flights");
  }
}
Now, create the 2nd class of the page object model. It has the main logic to set locations and dates plus a method to search for the available flights.
// FlightsPage.java
import org.openqa.selenium.*;
import java.time.Duration;
import org.openqa.selenium.support.ui.*;
import org.openqa.selenium.support.locators.RelativeLocator;

public class FlightsPage {
  private WebDriver wd;
  private WebDriverWait wt;

  public FlightsPage(WebDriver wd) {
    this.wd = wd;
    this.wt = new WebDriverWait(wd, Duration.ofSeconds(10));
  }

  public WebElement setLocation(String location, String locPath) {

    // Find the input field
    WebElement locFld = new WebDriverWait(wd, Duration.ofSeconds(10))
      .until(ExpectedConditions.visibilityOfElementLocated(By.xpath(locPath)));

    // Clear existing content and set new value in the origin input field
    locFld.clear();
    locFld.sendKeys(location);

    // Wait for the dropdown suggestions to appear
    WebElement firstSuggestion = wt.until(ExpectedConditions.presenceOfElementLocated(RelativeLocator
      .with(By.className("zsRT0d"))
      .below(locFld)));

    // Click on the first suggestion
    firstSuggestion.click();

    return locFld;
  }

  public WebElement setDate(String dateStr, WebElement left) {

    try {
      // Wait for the date field to appear
      WebElement dateFld = wt.until(ExpectedConditions.presenceOfElementLocated(RelativeLocator
        .with(By.tagName("input"))
        .toRightOf(left)));

      // Click on the first suggestion
      dateFld.clear();
      dateFld.sendKeys(dateStr);

      return dateFld;

    } catch (Exception e) {
      // Handle the exception (e.g., log it) and return null or a default WebElement
      System.out.println("Element not found: " + e.getMessage());
      return null;
    }
  }

  public void searchFlight(String searchPath) {

    try {
      // Find the search button
      WebElement searchBtn = new WebDriverWait(wd, Duration.ofSeconds(2))
        .until(ExpectedConditions.visibilityOfElementLocated(By.xpath(searchPath)));

      // Click on the search
      searchBtn.click();

    } catch (Exception e) {
      // Handle the exception (e.g., log it)
      System.out.println("Search button not found: " + e.getMessage());
      // You may choose to throw a custom ex
      // Or handle it in another way as per your req.
    }
  }
}
You may have noticed that we have used the new Selenium 4 relative locators in the above code. This puts up a good example of their usage. You can try to use them in your other automation tasks.
Step2. Create a Test Class
Create a test class that utilizes the page classes to perform the desired actions. This class mainly consumes the methods present in the second Page class. It sets up the source and destination locations. After that, it checks out the departure and arrival dates. Finally, it finds and presses the “Search” button.
// FlightBookingTest.java
import org.openqa.selenium.*;
import org.openqa.selenium.chrome.*;
import java.time.LocalDate;
import java.time.format.DateTimeFormatter;

public class FlightBookingTest {
  public static void main(String[] args) {
    // Set the path to the ChromeDriver executable
    System.setProperty("webdriver.chrome.driver", "/opt/chromedriver/chromedriver");

    // Configure ChromeOptions to start with a maximized window
    ChromeOptions options = new ChromeOptions();
    options.addArguments("--start-maximized");

    // Create a new instance of the ChromeDriver
    WebDriver wd = new ChromeDriver(options);

    try {
      // Instantiate the page classes
      HomePage homePage = new HomePage(wd);
      FlightsPage flightsPage = new FlightsPage(wd);

      // Open the Google Flights homepage
      homePage.navigateToFlights();

      // Perform flight search
      flightsPage.setLocation("Lucknow", "//*[@id='i21']/div[1]/div/div/div[1]/div/div/input");
      WebElement e1 = flightsPage.setLocation("New Delhi", "//*[@id='i21']/div[4]/div/div/div[1]/div/div/input");

      DateTimeFormatter formatter = DateTimeFormatter.ofPattern("E, MMM d");
      LocalDate date1 = LocalDate.now().plusDays(2);
      String dateS1 = date1.format(formatter);
      System.out.println("Formatted Date 1: " + dateS1);

      LocalDate date2 = date1.plusDays(2);
      String dateS2 = date2.format(formatter);
      System.out.println("Formatted Date 2: " + dateS2);

      WebElement e2 = flightsPage.setDate(dateS1, e1);
      WebElement e3 = flightsPage.setDate(dateS2, e2);

      e3.sendKeys(Keys.RETURN);
      flightsPage.searchFlight("//span[text()='Done']");
      flightsPage.searchFlight("//span[text()='Search']");
      pause(5000);

    } finally {

      // Close the browser
      wd.quit();
    }
  }

  public static void pause(int ms) {
    // Pause for a moment before quitting (to check visually)
    try {
      Thread.sleep(ms);
    } catch (InterruptedException e) {
      e.printStackTrace();
    }
  }
}
Step3. Run the Test
You can use Eclipse, IntelliJ, VS code, or many other tools to set up and run this Page Object Model project. However, if you plan to compile and run it from the command line using javac, you’ll need to follow these steps:
- Download Selenium JARs:
- Download the Selenium WebDriver JAR files from the official Selenium website.
- Save the JAR files (e.g.,
selenium-java-x.x.x.jar) to a directory.
- Download ChromeDriver:
- Download the ChromeDriver executable from the official ChromeDriver website.
- Save the ChromeDriver executable to a directory.
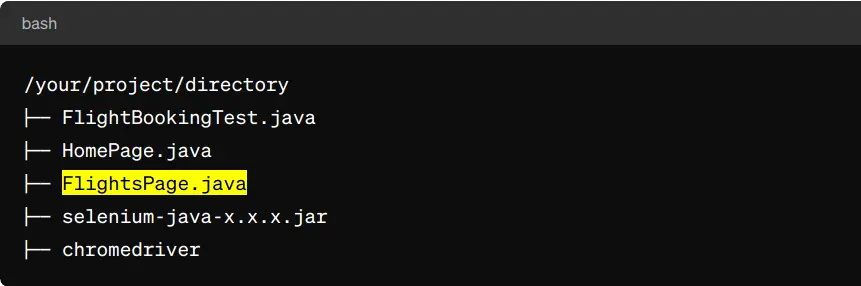
- Directory Structure:
- Make sure you have the following directory structure:
- Compile and Run:
- Open a terminal and navigate to your project directory.
- Compile the Java files using the
javaccommand:
$ javac -cp ".:selenium-java-x.x.x.jar" FlightBookingTest.java HomePage.java FlightsPage.java
- Replace
selenium-java-x.x.x.jarwith the actual name of the Selenium JAR file. - Run the Java class using the
javacommand:
$ java -cp ".:selenium-java-x.x.x.jar" FlightBookingTest
Make sure to replace x.x.x it with the actual version number of the Selenium JAR file.
This should compile and run your Selenium Java test from the command line without using any build tools.
The Concept of Page Factory
Page Factory in Selenium is a utility class that provides a simple way to initialize web elements in the Page Object Model (POM). It uses annotations like @FindBy to locate and initialize elements automatically. While using it, you don’t need to initialize the WebElement separately. It reduces a lot of your code and increases its maintainability.
Page Factory supports different locators, such as IDs and CSS selectors. This is how you can use it to handle various scenarios. Its main purpose is to make the interaction with web elements as easy as possible. It ensures your Selenium test scripts are more concise and readable.
Benefits of the Page Factory
It brings several benefits which are as follows:
Demo Selenium Project for Page Factory
We have modified the same project we used in the page object model test for the Page Factory. The test project had 3 files, now, these files are updated to use the Selenium Page Factory classes. You can compile and run the tests as you did for the POM test project.
1. HomePage.java
Please note that there is no change in this file. So, you can use it as is.
2. FlightsPage.java
This file has changes for the page factory class. The locators have been specified using the FindBy annotations. As a result, we no longer needed to find them separately.
import org.openqa.selenium.*;
import java.time.Duration;
import org.openqa.selenium.support.ui.*;
import org.openqa.selenium.support.FindBy;
import org.openqa.selenium.support.PageFactory;

public class FlightsPage {
  private WebDriver wd;
  private WebDriverWait wt;

  @FindBy(xpath = "//*[@id='i21']/div[1]/div/div/div[1]/div/div/input")
  private WebElement orign;

  @FindBy(xpath = "//*[@id='i21']/div[4]/div/div/div[1]/div/div/input")
  private WebElement destn;

  @FindBy(className = "zsRT0d")
  private WebElement suggestion;

  public FlightsPage(WebDriver wd) {
    this.wd = wd;
    this.wt = new WebDriverWait(wd, Duration.ofSeconds(10));
    PageFactory.initElements(wd, this);
  }

  public void setOrign(String location) {
    orign.clear();
    orign.sendKeys(location);
    wt.until(ExpectedConditions.visibilityOf(suggestion)).click();
  }

  public void setDestn(String location) {
    destn.clear();
    destn.sendKeys(location);
    wt.until(ExpectedConditions.visibilityOf(suggestion)).click();
  }
}
3. FlightBookingTest.java
This file has changed to adjust itself as per the new FlightsPage.java. It limited itself to set only the source and destination locations. Yet, you can enjoy checking out the application of Page Factory.
import org.openqa.selenium.*;
import org.openqa.selenium.chrome.*;

public class FlightBookingTest {
  public static void main(String[] args) {
    // Set the path to the ChromeDriver executable
    System.setProperty("webdriver.chrome.driver", "/opt/chromedriver/chromedriver");

    // Configure ChromeOptions to start with a maximized window
    ChromeOptions options = new ChromeOptions();
    options.addArguments("--start-maximized");

    // Create a new instance of the ChromeDriver
    WebDriver wd = new ChromeDriver(options);

    try {
      // Instantiate the page classes
      HomePage homePage = new HomePage(wd);
      FlightsPage flightsPage = new FlightsPage(wd);

      // Open the Google Flights homepage
      homePage.navigateToFlights();

      // Perform flight search
      flightsPage.setOrign("Lucknow");
      flightsPage.setDestn("New Delhi");

      pause(5000);

    } finally {
      // Close the browser
      wd.quit();
    }
  }

  public static void pause(int ms) {
    // Pause for a moment before quitting (for manual verification)
    try {
      Thread.sleep(ms);
    } catch (InterruptedException e) {
      e.printStackTrace();
    }
  }
}
Page Object Model (POM) vs Page Factory in Selenium
At this point, you already have enough details about both these concepts. However, let’s draw a simple comparison to lead your understanding a notch further.
Page Object Model (POM) and Page Factory are tools for simplifying writing test cases. POM helps to organize things neatly, and Page Factory makes handling elements easier. Both work together to keep your code clean and make the tests simpler.
Page Object Model (POM)
Page Factory
Combining POM and Page Factory
Summary
More Resources to Learn Selenium at TechBeamers
We have covered many key topics in Selenium and Java. So, keep learning and continue gaining more skills and experience. Identify topics of your interest from the below list of trending tutorials.
Lastly, our site needs your support to remain free. Share this post on social media (Linkedin/Twitter) if you gained some knowledge from this tutorial.
Enjoy testing,
TechBeamers.