Hey there! Welcome to this in-depth tutorial on exception handling in Java. In programming, errors happen but you can handle them gracefully with the help of a cool feature like exception-handling.
Get Started with Exception Handling in Java
In this guide, we’ll break down the basics of exceptions. You will learn about different types and walk through some hands-on examples. It will help you get comfortable with handling errors in your code.
What are Exceptions in Java?
Exceptions in Java are problems that interrupt the normal flow of a program. They occur when an error or unexpected situation arises that the program cannot handle on its own. Common causes of these exceptions are as follows:
What is Exception Handling in Java?
Java provides a system to tackle runtime issues in a program known as exception handling. It offers programming syntax to catch and handle these problems:
This makes sure programs don’t crash unexpectedly.
What Happens When a Program Throws an Exception?
When a program encounters an error that it can’t handle on its own, it “throws” an exception. This is like a signal saying, “Something went wrong!”
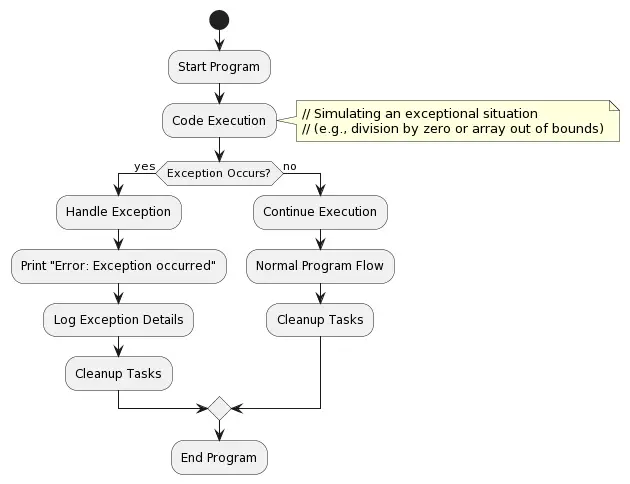
The following are the sequence of events that can happen when the program throws an exception:
We have added a general flowchart. It demonstrates how a Java program can handle errors by using exception handling.
How Important is Exception Handling in Java?
Exception handling is quite important for Java programs. It ensures that programs run smoothly, even when errors occur.
Here’s why exception handling is vital:
Without exception handling:
Effective exception handling:
Types of Exceptions
Java classifies exceptions into two main types: checked and unchecked.
Checked Exceptions
Checked exceptions are those that the compiler forces you to handle explicitly. They include situations that may arise at runtime but are known during compilation. Examples include IOException and SQLException.
Here is a simple Java program demonstrating checked exceptions.
import java.io.*;

public class SimpleReader {
    public static void main(String[] args) {
        try {
            BufferedReader r = new BufferedReader(new FileReader("file.txt"));
            String c = r.readLine();
            System.out.println("File content: " + c);
            r.close();
        } catch (IOException e) {
            System.out.println("Error: Unable to read the file. Details: " + e.getMessage());
        }
    }
}
The above Java code deals with potential file reading issues. The try-catch block manages IOException, displaying an error message if it occurs. It ensures robust handling of file operation challenges.
Unchecked Exceptions
Unchecked exceptions, a.k.a., runtime exceptions, do not require explicit handling. They typically occur due to programming errors at runtime and are subclasses of the RuntimeException class. Examples include ArithmeticException and NullPointerException.
Let’s take a basic Java example to show how to handle unchecked exceptions in real time.
public class SimpleDivision {
    public static void main(String[] args) {
        int num = 10, denom = 0;

        try {
            int result = num / denom;
            System.out.println("Result: " + result);
        } catch (ArithmeticException e) {
            System.out.println("Error: Division by zero. " + e.getMessage());
        }
    }
}
In this program, we try to divide two numbers. If the second number is 0, an ArithmeticException occurs. The try-catch block catches this exception, and we print an error message. This demonstrates how we handle unchecked exceptions in a basic division operation.
Checked vs Unchecked
Here is a neck to the comparison between the two types of exceptions.
| Checked Exceptions | Unchecked Exceptions |
|---|---|
| Must be handled or declared in the method signature. | Not required to be handled explicitly. |
| IOException, SQLException | ArithmeticException, NullPointerException |
| External conditions (I/O, database operations) | Programming errors or runtime issues |
In code, think of it this way:
Checked Exceptions: You have to deal with them or tell the program you’re aware they might happen.
Unchecked Exceptions: They might happen, and the program doesn’t insist you specifically plan for them. They often point to coding mistakes.
Exception Handling Examples
You can now explore some Java exception-handling examples. We have added multiple coding snippets to demonstrate a variety of use cases.
Basic Exception Handling in Java
Let’s delve into the basic syntax of handling exceptions in Java.
public class ExceptionHandlingExample {
    public static void main(String[] args) {
        try {
            // Simulating a scenario that may cause an exception
            int result = performOperation(8, 0);
            System.out.println("Result of the operation: " + result);
        } catch (ArithmeticException e) {
            // Handling the specific exception
            System.out.println("Oops! Cannot divide by zero.");
        } finally {
            // Code executed regardless of an exception
            System.out.println("Finally block executed.");
        }
    }

    // A method that may throw an exception
    private static int performOperation(int num1, int num2) {
        // Simulating a situation where dividing by zero occurs
        return num1 / num2;
    }
}
The above Java code divides numbers, but things get tricky when the division by zero occurs. The performOperation method deals with this by throwing an ArithmeticException, caught in a try-catch block. The finally block guarantees that certain code runs, regardless of what happens during the operation.
Catching Multiple Exceptions
You can catch multiple exceptions in the same catch block or have multiple catch blocks for different exception types.
public class MultipleExceptionsExample {
    public static void main(String[] args) {
        try {
            // Simulating situations that may cause different exceptions
            int[] numbers = {1, 2, 3};
            System.out.println("Value at index 4: " + numbers[4]); // ArrayIndexOutOfBoundsException
            int result = performComputation(10, 0);                // ArithmeticException
        } catch (ArrayIndexOutOfBoundsException | ArithmeticException e) {
            // Handling multiple exceptions with a single catch block
            System.out.println("Ex Text: " + e.getMessage());
        }
    }

    // A method that may throw an exception
    private static int performComputation(int num1, int num2) {
        // Simulating a situation where dividing by zero occurs
        return num1 / num2;
    }
}
In this Java example, we’re dealing with numbers. The performComputation method tries to calculate, but it might run into trouble, like reaching beyond an array’s limits or attempting to divide by zero. The try-catch block helps manage these issues neatly in a single go.
Advanced Topics in Exception Handling
How to Use finally Block in Java?
The finally block runs no matter if an exception happens or not. It’s often used for cleaning up tasks, such as closing files or releasing resources in your code.
public class CleanupTaskExample {
    public static void main(String[] args) {
        try {
            // Simulating a situation that may cause an exception
            int result = performTask(15, 3);
            System.out.println("Task Result: " + result);
        } catch (ArithmeticException e) {
            // Handling the specific exception
            System.out.println("Oops! Cannot perform the task.");
        } finally {
            // Code executed regardless of an exception
            System.out.println("Cleanup: Task completed or not, we clean up here.");
        }
    }

    // A method that may throw an exception
    private static int performTask(int num1, int num2) {
        // Simulating a situation where dividing by zero occurs
        return num1 / num2;
    }
}
In this Java code, check out our CleanupTaskExample which executes a task. It has a try-catch block to handle any error like dividing by zero. The “finally” block ensures cleanup happens, no matter what. It’s like tidying up after the task, making our code solid and dependable.
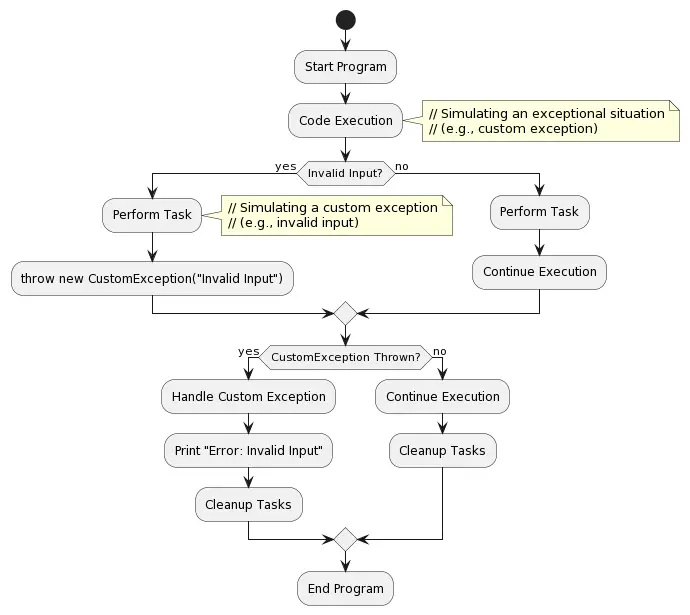
How to Create Custom Exceptions in Java?
In Java, you can extend the Exception class to create your custom exception classes. This enables you to define and throw exceptions that suit your application’s needs. Here is a flowchart that is trying to demonstrate the custom exception handling flow in Java.
The following code snippet illustrates how to handle custom exceptions in Java code.
public class AgeValidationExample {
    public static void main(String[] args) {
        try {
            // Simulating a scenario that may lead to a custom exception
            verifyAge(15);
        } catch (InvalidAgeException e) {
            // Handling the custom exception
            System.out.println("Oops! " + e.getMessage());
        }
    }

    // A method that may throw a custom exception
    private static void verifyAge(int age) throws InvalidAgeException {
        if (age < 18) {
            throw new InvalidAgeException("Age must be 18 or older.");
        }
        System.out.println("Age successfully verified.");
    }
}

// Custom exception class
class InvalidAgeException extends Exception {
    public InvalidAgeException(String message) {
        super(message);
    }
}
In this Java example, meet our AgeValidationExample. The verifyAge method checks if the age is below 18. It throws a custom exception (InvalidAgeException) in this case. The try-catch block takes care of this exception, giving us a fitting approach to handle age-related checks in our code.
You have finished learning the basics of exception handling in Java. Now, it is time to put your knowledge to the test. So, practice with our Java exception quiz with 20 interview questions.
Frequently Asked Questions (FAQ)
Go through the below section and clear any confusion you may have.
Exception handling in Java helps manage unexpected situations, ensuring that programs respond gracefully to errors and continue running without crashing.
Use a custom exception for handling application-specific errors or situations not covered by standard Java exceptions. It adds clarity to your code.
finally block important in dealing with exceptions? The finally block guarantees the execution of specific code, irrespective of whether an exception occurs. It’s handy for tasks like completing file operations or freeing resources.
Yes, you can catch multiple exceptions using the pipe symbol (|) in a single catch block. It provides a concise way to handle different exception types with similar actions.
To create a custom exception, extend the Exception class. This allows you to define and throw exceptions tailored to your application logic.
finally block without a catch block in Java? Yes, you can use the finally block without a catch block. It ensures that the specified code runs whether an exception occurs or not. It ensures to provide a consistent cleanup mechanism.
To handle division by zero, use a try-catch block around the division operation and catch the ArithmeticException. Implement appropriate actions in the catch block to address the situation.
Summary: Exception Handling in Java
By now, you must have learned how important exception handling in Java is for creating error-resistant programs. Java provides a clean system to catch and handle errors. Our tutorial taught you to be aware of checked and unchecked exceptions. It is the key to knowing how Java handles different errors.
Always use the finally block to free up resources like files or DB connections. You can also create custom exceptions to make your code clearer. By mastering exception handling, you ensure your Java programs run smoothly.
Lastly, our site needs your support to remain free. Share this post on social media (Linkedin/Twitter) if you gained some knowledge from this tutorial.
Happy Coding,
TechBeamers.


