This Selenium 4 tutorial shows you the simplest way to run WebDriver test cases in Chrome. With zero installation and minimal steps, you’ll be ready to go in no time. Chrome is the natural choice for many — it commands a 65% market share, while Firefox holds just 10% among popular browsers. And just a heads-up: this tutorial has been updated to use Selenium 4.
- How to Use Chrome for Running Webdriver Test Cases?
- Download Tools
- Simple Steps to Run Selenium Tests in Chrome
- Step 1: Prepare the Minimal Setup
- Step 2: Prepare the Build Script
- Step 3: Prepare the TestNG Run Script
- Step 4: Prepare the ChromeTest.java
- Step 5: Run the Test
- Did You Successfully Run a Webdriver Test in Chrome?
How to Use Chrome for Running Webdriver Test Cases?
There are actually many ways to run a Selenium Webdriver test case in Google Chrome. In this tutorial, we’ll cover the minimalistic approach to set up, build, and run a basic test case in Chrome. So, firstly, you will need the following components to prepare the minimal setup. Download them instantly from the given links.
Download Tools
For those preparing for Selenium and TestNG interviews, check out our Selenium & TestNG Interview Questions and Answers Part 2 to test your knowledge.
Simple Steps to Run Selenium Tests in Chrome
Follow these straightforward instructions to run the Selenium Webdriver in the easiest way possible.
Step 1: Prepare the Minimal Setup
Make sure that you have downloaded all the four components listed earlier in this tutorial. Once done, organize them in the following order:
selenium-minimal/
├── jdk/   ✅ Your portable JDK
├── libs/  ✅ All JARs here
│   ├── selenium-java-4.32.0.jar
│   ├── testng-7.8.0.jar
│   ├── webdrivermanager-6.1.0-fat.jar
│
├── testng.xml  ✅ To run the test
├── src/
│   └── com/
│       └── example/
│           └── ChromeTest.java
├── build.bat       ✅ To compile
├── run-testng.bat  ✅ To run and generate HTML report
Step 2: Prepare the Build Script
Copy the content of this section, paste it in a text file, and save the file as “build.bat”. It will build your code on Windows. In case, you see any error and unable to resolve it, do let us know via the comment box. We’ll ensure an early reply to fix your issue.
@echo off
REM === Set JAVA_HOME to use your portable JDK ===
set JAVA_HOME=%~dp0jdk
set PATH=%JAVA_HOME%\bin;%PATH%

javac -d bin -cp libs\* src\test\java\com\example\ChromeTest.java
Step 3: Prepare the TestNG Run Script
Here, we are providing you two things – the first is the testng.xml file and second is the the script code to run the test. Copy the below code and save it in a text file naming it as the testng.xml.
<!DOCTYPE suite SYSTEM "https://testng.org/testng-1.0.dtd">
<suite name="Suite">
  <test name="Test">
    <classes>
      <class name="com.example.ChromeTest"/>
    </classes>
  </test>
</suite>
Next, copy the below content and save it as the run-testng.bat. You can launch this file by double-clicking it or running it from the command prompt to execute the Selenium test case in Chrome.
@echo off
REM === Set JAVA_HOME to use your portable JDK ===
set JAVA_HOME=%~dp0jdk
set PATH=%JAVA_HOME%\bin;%PATH%

set CLASSPATH=libs\*;bin

java -cp %CLASSPATH% org.testng.TestNG testng.xml
Let’s see an example program written in Java. It’ll help you in running Webdriver test cases.
Step 4: Prepare the ChromeTest.java
In this example, the sample code would do the following.
🎯 While executing the below code, the Google Home Page will open in Chrome browser.
🎯 Then, we’ll validate the page title in our example.
This example runs a simple webdriver test case and demonstrates its execution in the Chrome browser.
// ChromeTest.java
//
package com.example;

import org.openqa.selenium.WebDriver;
import org.openqa.selenium.chrome.ChromeDriver;
import org.testng.Assert;
import org.testng.annotations.*;
import io.github.bonigarcia.wdm.WebDriverManager;

public class ChromeTest {

    WebDriver driver;

    @BeforeClass
    public void setUp() {
        // It tries to find the right driver
        WebDriverManager.chromedriver().setup();
        driver = new ChromeDriver();
        driver.manage().window().maximize();
    }

    @Test
    public void testGoogleTitle() {
        driver.get("https://www.google.com");
        String title = driver.getTitle();
        System.out.println("Page title is: " + title);
        Assert.assertEquals(title, "Google");
    }

    @AfterClass
    public void tearDown() {
        if (driver != null) {
            driver.quit();
        }
    }
}
Step 5: Run the Test
Now, first of all, check that everything is placed like the way we have shown in the step-1 or not. Carefully review and update as needed.
After that, you first have to run the build.bat which will compile the ChromeTest.java. It will create the bin folder structure containing the ChromeTest.class. You can verify if the class file is created or not.
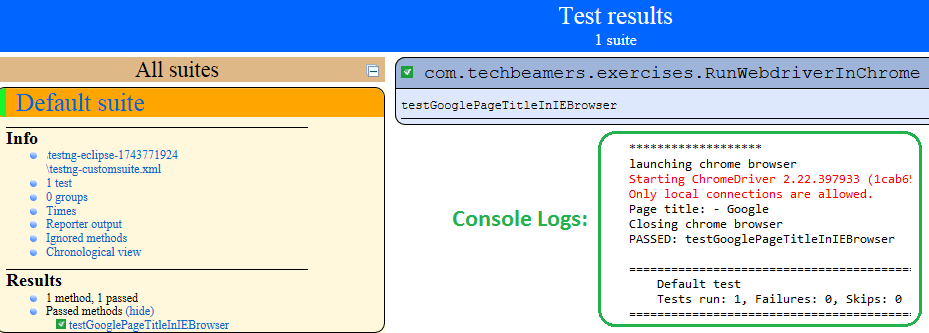
Once built, the next step is to launch the run-testng.bat file, it will open the Chrome browser, open google search, verify the title, and report the result.
Did You Successfully Run a Webdriver Test in Chrome?
Today, you learned how to set up Selenium Webdriver for running test cases in Chrome. Hopefully, you would have copied the code from our example, and run it successfully. However, if you face any runtime issues, do write us for a solution.
If you want more posts like “How to Use Chrome for Running Webdriver Test Cases“, please visit our site more often.
Lastly, our site needs your support to remain free. Share this post on social media (Linkedin/Twitter) if you gained some knowledge from this tutorial.
Enjoy coding,
TechBeamers.